Home Page › Forums › General Chat › Texture
- This topic has 15 replies, 5 voices, and was last updated 7 years, 6 months ago by
 ohey.
ohey.
-
AuthorPosts
-
April 14, 2019 at 6:54 PM #1039140
If nudity makes you physically or mentally sick , dont open this link and seek help.
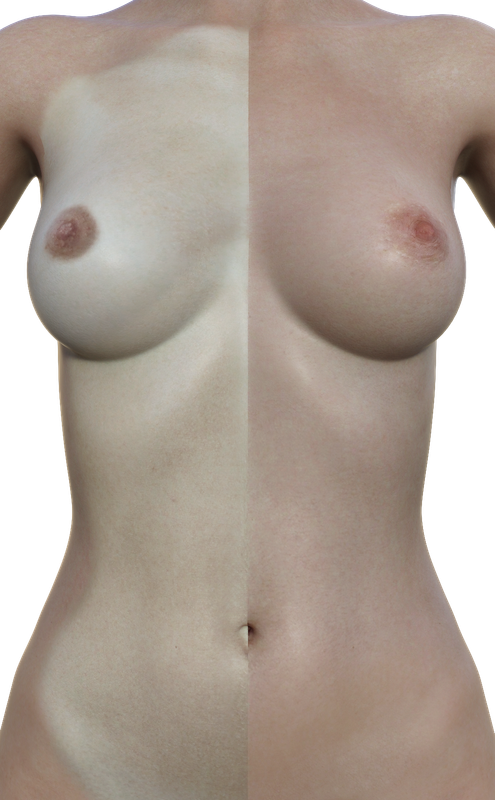
(https://i.postimg.cc/mkVYWqt1/skn.png)
So I starter messing with making my own texture. I came to the conclusion that its not worth the effort to try and do a complete skin. Minor edits to existing skins should be enough. The left side is mostly mine working on top of the skin to the right. Other than needing some touch up, I cant tell a huge difference in quality. If I were doing close ups, I could just edit a section of the character since renders from far away wont really matter.
If you can see at all where the edit might have improved it at all, let me know but, I only see minor differences.
April 15, 2019 at 1:45 AM #1039516what did you do? have you ever tried working with human reference images to alter you skins?
April 15, 2019 at 3:30 AM #1039612basically the human reference Ive seen here are either to low res or they are ugly.
So I Dled some 12,000px nudes where the subject showed full front and full back so I had the ability to use most of the image. This required scaling crops of the nude to about 1/6 its size. I figured that much detail scaled down would be better that what might have been done to create it. I took what I considered to be one of the best character skins and us it as a reference to work over replacing the texture as I went.I decided to only do a portion of the front. Both breasts and the stomach area as a start to see how it would possibly improve. when rendered next to the other skin I did not see a huge improvement if any. I am guessing that the character skin was also based off of a HD-photograph. So basically all I was doing was changing small things like nipple texture and skin color. Skin color is a fairly easy change so I dont see a good reason to dedicate tons of time to create a skin that has no detectable flaws when its already been made. I can add small imperfections or slight discolored areas, ect... a lot easier to a pre-existing skin.
April 16, 2019 at 2:20 AM #1041207you may want to reconsider the human reference photos here. they are not ugly they are real and very high res.
using her
https://zonegfx.com/3dsk-betty-human-photo-references-and-textures/
and this tutorial (damn, i can't find it.)
i created this skin (warning Nude 3D model) just the torso area. notice the belly button, breasts, nipples, collar bone and vag. also lightened areas where the sun does not shine creating some tan lines top and bottom.
https://i.imgur.com/WDjZaaK.png
the right is a standard G8F and on the left is my skin. this was just my first attempt an i think it's not too bad if i do say so myself. blended it in photoshop. i'll try to find the tutorial for you.
April 19, 2019 at 10:21 AM #1046080Good skin textures aren't only about a good albedo/base color texture. A lot of detail comes from normal, bump and specular maps as well. As an example, you can see there is quite a lot of color detail on the areolas and nipples, yet they still look as smooth as the skin around it. In reality, the skin on these areas is a little bumpier, especially around the edges. There are a lot of subtle details around the body that you can't reproduce with just a color map.
If you want to improve your textures you should look into how professional character texturing is done. There are a ton of tutorials on YouTube on how to create the different maps you need.
April 19, 2019 at 11:33 AM #1046148Oh, also you might want to give Substance Painter a try. It's quite easy to get into if you already know Photoshop. Doing all this in PS is a pain because you don't have immediate feedback on how stuff looks on the model. And getting the projection from photo reference to UV space right is hard, because you have to keep distortions in mind all the time.
In Painter (or similar software) you can paint and project directly onto the model.
As a realism workflow tip, you could try starting with normal/bump/specular maps before doing any color work and only adding color after the skin surface looks right. Most of the skin details we can see aren't mainly defined by surface color changes but by the way light interacts with it. So if your other maps look right, it's a lot easier to get a good looking result when adding color.
April 20, 2019 at 1:47 AM #1047102Thanks. It was posted here a bit ago and I downloaded it but, havent tried messing with it. My biggest question Is it with worth the effort to build a skin that seems to already have been build. I dont see much of a difference to invest a few days or work to produce the same results.
April 21, 2019 at 10:21 AM #1048916It kind of depends on what you want/need, right? There are a lot of decent and even high quality skin materials around, but they might not have the right look. Creating a high quality skin from scratch is a lot of work, at least if it has to look right in close-ups and certain lighting conditions. But you learn a lot too, so that's up to you if you want to invest that time.
Customizing good skins to your liking is of course faster, and might be enough. Many have ok-ish to good texture maps you can use and tweak. I just wouldn't invest 90% of my time into the color texture because the other maps are just as important, especially for details. Even just tweaking a few shader parameters like the bump value might get you closer to the look you want.
April 21, 2019 at 3:22 PM #1049201I had some time and hadn't played with skins myself for a while, so I made some examples of how the "other" maps many people neglect change the way the skin looks, without touching the color map: Mega.nz folder
I used FWSA Charis textures for the examples. As with many skins you find out there, the creators were a bit sloppy and only customized the color texture. Bump, normal and specular maps are generic skin resource stuff. To get more (and actually matching) details on the areolas, I replaced the generic parts in the bump and specular maps with the greyscale of the blue channel in the color texture (with some level adjustments). I also used this greyscale map to generate the normal map details using the normal generate filter in Photoshop (located in Filters, 3D).
As you can see, matching maps actually help bring out details in the color map a lot. The source material I used wasn't ideal, with high quality shots and more time you can make even better maps.
You can also add subtle details like fine body hair. I included one example with mesh hair (which was actually for males, so it's a bit long) to show how it can add to overall realism. As long as you don't need body hair sticking out for extreme close ups, you can actually achieve a very similar effect using specular/glossiness maps. I made this very quickly and with semi-nice source materials, so again this can look a lot better.
Hope this helps a few people understand skin texturing a little more. 🙂
April 21, 2019 at 4:39 PM #1049295Are there any packaged products that go to the level of effort that you've done, Ohey? The version you have with all the updated elements including the body hair is quite impressive.
April 21, 2019 at 10:34 PM #1049557Those are actually two different texture sets, and the hairs are only above the belly button. 😉 I just quickly enhanced a mediocre texture set with hair to show it's possible.
There probably are a few texture sets that have that level of detail, but I haven't really been doing much close-up rendering in DAZ Studio as of yet, so I never looked that closely either.
I can check my resources folder if I have any that are somewhat decent. But my guess would be that 99% are just very basic customizations of merchant resource kits.
April 22, 2019 at 1:54 AM #1049725Anonymous
InactiveRank:
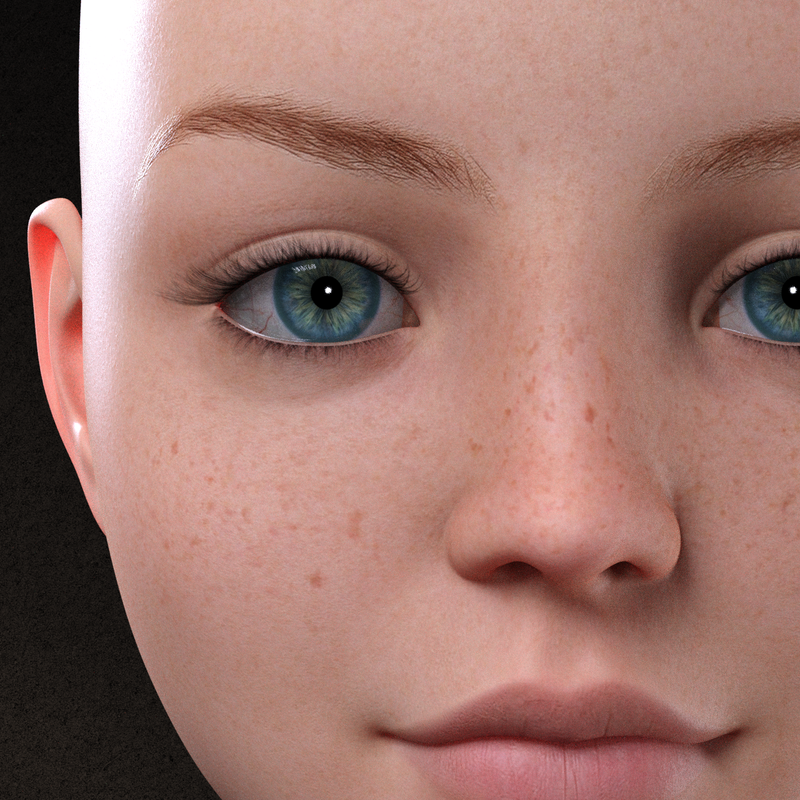
@ohey - I've been talking about this sort of thing for the better part of a year when people ask how I manage to get details out of my characters like that. Knowing the textures and how they interact, especially with a lot of micro details such as skin can make or break the effects.
Current WIP:
 April 22, 2019 at 4:13 AM #1049822
Vanilla Sky back many years ago from Syyd Raven when RDNA was a seperate entity was/is the best skin package I ever owned for V4. I'm not sure if she's still creating anymore now that they were acquired by Daz but if there's a package out from her, it probably meets that quality bar. I don't really do close-up renders either so that level of detail isn't a big need for me but nonetheless, good discussion here.
April 22, 2019 at 5:24 AM #1049873From what I have read in the past and recently, there are 2 things that will push a skins limits. one would be the bump map. Small details like skin creases and pores will help. But the one that I think would be the most helpful might be the hardest to do. It is link a bump map with actual bumps. If a person were to put dimples/pores in the model and lay the map over those bumps.
April 22, 2019 at 5:47 AM #1049893InactiveRank:@d0gg0d - That's exactly what I've done, and can especially be seen in Discordia's closeups. I pulled the info for her pores in one of the RGB channels, and converted to greyscale. A few minor adjustments, and I was thrilled with the results.
-
AuthorPosts





- You must be logged in to reply to this topic.